Omega - Installation Guide

The Omega One installs much like a standard single-post brake, and is the easiest aero brake on the market to set up.

  1. Begin by removing the wheel - it is easier to install the Omega One without a wheel in place. We will bring it back for pad adjustment later.
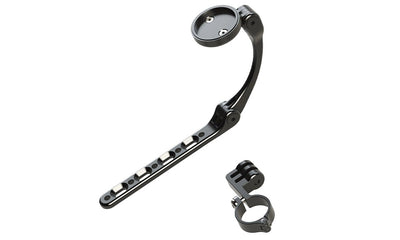
  2. If your bike uses a direct-mount standard, either Shimano Direct-Mount or TRP U-Mount, begin by removing any pre-installed canti studs, to expose the direct mount bosses. These will be either M6 threaded holes (for Shimano Direct Mount) or M8 holes (for TRP U-Mount). The Omega One universal Direct-Mount Adapter is compatible with both. If your bike has both direct-mount AND traditional single-bolt attachment options, always use the single-bolt attachment.
  3. Next, remove the Omega One Front Plate and install the brake with one of the included M6 Thru Bolts.
  • If your bike has a standard single-post brake mount, thread the M6 Thru-Bolt through the brake, then one or more Serrated Washers positioned on the back of the brake. Pinch in place and slide the whole onto the fork. Hold it in place with a 4mm hex wrench, while you tighten the Recessed Nut with a 5mm wrench. Tighten to a torque of 10-12 Nm, or whatever is recommended by your fork manufacturer.
  • If you are using the Direct-Mount Adapter, use the shortest thru bolt, which is 14mm long - you do not need any additional Serrated Washers or Recessed Nut, as these are integrated into the Direct Mount Adapter itself. Tighten using a 4mm hex wrench to a torque of 7-8 Nm.
  • Next, run brake cable housing up to the Omega One cable hanger, and run a brake cable through the brake levers on your handlebars, and through the Omega One Wedge. Pull the cable taut using a pair of pliers, and ensure there is no slack in the system by actuating the handlebar brake lever while also keeping tension on the cable. (If you are using an upstream cable stop, such as the integrated stop on our Alpha One aerobars, run your housing to that stop and simply run bare cable through the Omega One Cable Hanger).
  • Keeping the cable taut with the pliers, tighten the center pinch bolt on the Wedge, to a torque of 4 Nm.
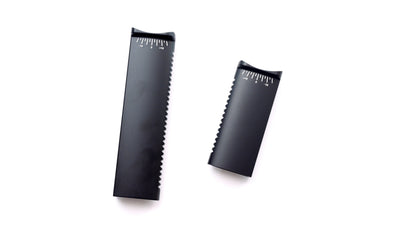
  • Trim the cable, leaving approximately 1cm of cable below the Wedge. You may install a cable tip at this time if you wish. However, ensure that there is at least 3mm between the bottom of the cable tip and the bottom of the Omega One Back Plate arc, to ensure that the cable tip will not contact the Front Plate when it is replaced. Any cable interference will compromise the brake's ability to return properly.
  • Replace the Omega One Front Plate, and reinstall the wheel.
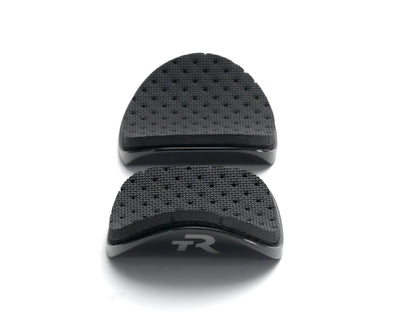
  • The Omega One comes with Kool Stop Salmon pads, the industry's best pad for use on alloy rims in any riding conditions. If you are using carbon rims, use the brake pad supplied by that rim manufacturer. Or if none is supplied, we recommend the SwissStop Black Prince pad, available at your local bike shop. Adjust the pad height and pad angle, ensuring it properly contacts the center of your rim's brake track. Using the M4 set screws on the sides of the Omega One Levers, adjust the pad stance width so that the pads are 1-2mm away from the rim on either side.
  • You're ready to ride!

Fit Guide

This Guide shows you how to set up your TriRig Omni with the TriRig Alpha One or Alpha X aerobars. This Guide can help you replicate your current bike position, or set up your bike based on numbers from a bike fitter. The Fit Chart below shows the actual X/Y coordinates of your arm pads measured from the bottom bracket. This coordinate is the most important number that bike fitters use to determine your position on a triathlon bike. Be aware that some fitters use a coordinate to the top/back of the pad, rather than the top/center. In that case, you can subtract 44mm from all of the reach numbers in the Fit Chart, which yields the back of pad number. The steps below provide an easy-to-follow system for making sure you have the perfect fit with your Omni.

Step 1: Determine your current fit numbers

What we want is the X/Y coordinate to the top/center of your aerobar pads, measured from the bottom bracket. Most bike fitters can provide this number to you when performing a bike fit (although some provide it to the top/back of the pads rather than top/center). If you already know these numbers, you can skip this step. Otherwise, follow the steps below to determine these numbers for your current bike setup:

1-Place your bicycle up against the corner of a room, with the back tire abutting the wall.

2-Next, measure the vertical distance from the floor to the center of the bottom bracket. We'll call this measurement Floor Offset (FO).

3-Measure the horizontal distance from the wall to the center of the bottom bracket, we'll call this measurement Wall Offset (WO).

4-Measure the vertical distance from the floor to the top of your aerobar pads. This measurement will be Pads-To-Floor (PTF).

5-Measure the horizontal distance from the wall to the center of your aerobar pads. This will be called Pads-To-Wall (PTW).

6-Subtract Floor Offset from Pads-To-Floor (PTF minus FO). This is your Pad Stack.

7-Subtract Wall Offset from Pads-To-Wall (PTW minus WO). This is your Pad Reach.

Step 2: Review Frame Geometry

Small Medium Large
Frame Stack
(BB to Headset)
490mm 525mm 560mm
Frame Reach
(BB to Headset)
375mm 405mm 435mm
Front Center 560mm 600mm 640mm
Rear Center 400mm 400mm 400mm
Seat Angle 79° 79° 79°
Head Angle 72.5° 72.5° 72.5°
Fork Offset 48mm 48mm 48mm

Step 3: Select Size, then find your position on the chart

The chart below shows the stack and reach information for the TriRig Omni with the included Alpha X aerobar, complete with the number of extension spacers and stem spacers used for each setup. Here's how to use the chart:

1-Use the dropdown box in the upper-right corner of the chart to select a bike size.

2-Find your Stack in the left-hand column of the chart, or the row that most closely matches your stack. Every cell in this row represents a way to set up the Alpha X on your Omni that will produce this stack number.

3-Each cell states the amount of Pad Spacers as well as Stem Spacers to use in order to hit your stack number.

4-In most cases, there will be multiple cells that can hit your stack. The best setup for your position will generally be the one with additional colored cells above AND below your selected cell. These cells represent room to move up or down in the future, merely by adding or removing Pad Spacers, which is generally the easiest way to make a position change.

5-Cells in blue represent a standard setup with the extensions over the bar. Cells in green represent the special undermount position, where the extensions are mounted below the bar.

6-Once you have selected a cell from your Stack row that represents your preferred position, look at the bottom of that column to the Reach section. The three rows of Reach cells show the reach to the center of the pad based on the three different adjustment positions available on the Alpha X arm cups. Select the one that most closely matches your Pad Reach number, and set up your pads/cups accordingly.

7-Note that fit numbers for the Omni w/ Alpha X are measured from the top/center of the headset to the top/center of the pad. All measurements for overmount hardware include the integrated BTA mount.